一、准备工作
两台机器:192.168.0.93(服务端) 192.168.0.92 (客户端)
两台机器关闭selinux,清空iptables规则,并保存,设置hostname
192.168.0.93 上 hostname web9.yanyi.com
编辑 /etc/sysconfig/network 定义hostname

192.168.0.92 上 hostname web10.yanyi.com
编辑 /etc/sysconfig/network 定义hostname

编辑hosts文件
192.168.0.93 和 192.168.0.92全部为

两台机器安装ntpdate,并建立自动同步时间的任务计划:
crontab -e #加入
1 2
| [root@web9 ~] */10 * * * * ntpdate time.windows.com >/dev/null 2>&1
|
1 2
| [root@web10 ~] */10 * * * * ntpdate time.windows.com >/dev/null 2>&1
|

二、安装 puppet
1.安装服务端
服务端(192.138.0.93)上
安装puppet 源
安装服务端程序
启动服务
1 2
| [root@web9 ~] 启动 puppetmaster: [确定]
|
开机启动
2.安装客户端
客户端(192.168.0.92)上
安装puppet 源
安装客户端程序
修改配置文件 /etc/puppet/puppet.conf 在最后面添加
1 2
| server = web9.yanyi.com runinterval = 10
|

启动服务
1 2
| [root@web10 ~] Starting puppet agent: [确定]
|
开机启动
三、配置认证
服务端查看客户端证书列表 puppet cert list –all #如果签发的证书,会本行最前面带一个+
1 2 3
| [root@web9 ~] "web10.yanyi.com" (SHA256) 16:BF:29:D2:D3:56:18:25:CE:8E:E3:89:E7:6E:08:65:BB:BC:F7:1F:98:86:0D:DA:C8:48:B8:60:75:A8:77:94 + "web9.yanyi.com" (SHA256) F6:E5:87:3B:AF:F1:A0:37:D9:5E:05:B1:19:FB:49:C7:AE:EC:DD:B6:4F:F5:11:BE:70:18:3D:46:A8:FE:E5:A0 (alt names: "DNS:puppet", "DNS:puppet.yanyi.com", "DNS:web9.yanyi.com")
|
客户端上生成ssl证书 puppet agent –test –server web9.yanyi.com
1 2 3 4 5 6 7 8 9
| [root@web9 ~] Warning: Unable to fetch my node definition, but the agent run will continue: Warning: undefined method `include?' for nil:NilClass Info: Retrieving pluginfacts Info: Retrieving plugin Info: Caching catalog for web9.yanyi.com Info: Applying configuration version '1487260353' Info: Creating state file /var/lib/puppet/state/state.yaml Notice: Finished catalog run in 0.01 seconds
|
服务端签发指定客户端证书
1 2 3
| [root@web9 ~] Notice: Signed certificate request for web10.yanyi.com Notice: Removing file Puppet::SSL::CertificateRequest web10.yanyi.com at '/var/lib/puppet/ssl/ca/requests/web10.yanyi.com.pem'
|
执行 puppet cert list –all 看是否成功
1 2 3
| [root@web9 ~] + "web10.yanyi.com" (SHA256) 50:B7:39:53:62:3C:BA:AF:BD:7B:B3:48:99:B7:3D:B2:9D:DE:5E:34:71:FD:3A:2B:8A:34:98:09:2C:02:6F:87 + "web9.yanyi.com" (SHA256) F6:E5:87:3B:AF:F1:A0:37:D9:5E:05:B1:19:FB:49:C7:AE:EC:DD:B6:4F:F5:11:BE:70:18:3D:46:A8:FE:E5:A0 (alt names: "DNS:puppet", "DNS:puppet.yanyi.com", "DNS:web9.yanyi.com")
|
服务端可以删除指定客户端证书
1 2 3 4
| [root@web9 ~] Notice: Revoked certificate with serial 3 Notice: Removing file Puppet::SSL::Certificate web10.yanyi.com at '/var/lib/puppet/ssl/ca/signed/web10.yanyi.com.pem' Notice: Removing file Puppet::SSL::Certificate web10.yanyi.com at '/var/lib/puppet/ssl/certs/web10.yanyi.com.pem'
|
1 2
| [root@web9 ~] + "web9.yanyi.com" (SHA256) F6:E5:87:3B:AF:F1:A0:37:D9:5E:05:B1:19:FB:49:C7:AE:EC:DD:B6:4F:F5:11:BE:70:18:3D:46:A8:FE:E5:A0 (alt names: "DNS:puppet", "DNS:puppet.yanyi.com", "DNS:web9.yanyi.com")
|
删除所有证书 puppet cert clean –all
1 2 3 4 5
| [root@web9 ~] Notice: Revoked certificate with serial 2 Notice: Removing file Puppet::SSL::Certificate web9.yanyi.com at '/var/lib/puppet/ssl/ca/signed/web9.yanyi.com.pem' Notice: Removing file Puppet::SSL::Certificate web9.yanyi.com at '/var/lib/puppet/ssl/certs/web9.yanyi.com.pem' Notice: Removing file Puppet::SSL::Key web9.yanyi.com at '/var/lib/puppet/ssl/private_keys/web9.yanyi.com.pem'
|
删除所有证书以后,服务端执行 puppet agent –test –server web9.yanyi.com
1 2 3 4 5 6 7 8
| [root@web9 ~] Info: Creating a new SSL key for web9.yanyi.com Info: csr_attributes file loading from /etc/puppet/csr_attributes.yaml Info: Creating a new SSL certificate request for web9.yanyi.com Info: Certificate Request fingerprint (SHA256): AF:C5:3E:47:E7:6F:38:11:C5:F9:04:EB:05:8D:81:A1:FF:4E:8F:89:0B:28:38:A2:79:8F:B2:1A:D2:D5:26:A3 Exiting; no certificate found and waitforcert is disabled [root@web9 ~] "web9.yanyi.com" (SHA256) AF:C5:3E:47:E7:6F:38:11:C5:F9:04:EB:05:8D:81:A1:FF:4E:8F:89:0B:28:38:A2:79:8F:B2:1A:D2:D5:26:A3
|
客户端需删除 ssl 目录下所有文件并重启服务
1 2 3 4
| [root@web10 ~] [root@web10 ~] Stopping puppet agent: [确定] Starting puppet agent: [确定]
|
然后服务端查看,并重签
1 2 3
| [root@web9 ~] "web10.yanyi.com" (SHA256) 58:48:87:28:06:26:CA:53:86:31:A0:78:B7:55:E5:F7:6E:C2:3E:5E:19:48:19:C3:96:E9:42:9F:D9:96:13:EC "web9.yanyi.com" (SHA256) AF:C5:3E:47:E7:6F:38:11:C5:F9:04:EB:05:8D:81:A1:FF:4E:8F:89:0B:28:38:A2:79:8F:B2:1A:D2:D5:26:A3
|
1 2 3
| [root@web9 ~] Notice: Signed certificate request for web9.yanyi.com Notice: Removing file Puppet::SSL::CertificateRequest web9.yanyi.com at '/var/lib/puppet/ssl/ca/requests/web9.yanyi.com.pem'
|
1 2 3
| [root@web9 ~] Notice: Signed certificate request for web10.yanyi.com Notice: Removing file Puppet::SSL::CertificateRequest web10.yanyi.com at '/var/lib/puppet/ssl/ca/requests/web10.yanyi.com.pem'
|
1 2 3
| [root@web9 ~] + "web10.yanyi.com" (SHA256) B0:2C:B1:C4:B7:E3:3E:1A:40:99:D2:4F:6F:E3:1E:1E:24:69:22:07:68:D9:C9:F4:9E:5F:4A:D9:BF:35:F6:27 + "web9.yanyi.com" (SHA256) D0:49:21:D3:4E:B6:EA:48:19:4D:29:F4:4C:A1:16:77:BC:DD:8E:BA:73:6C:83:0A:37:5F:5D:F8:0B:67:B1:B7
|
四、 配置自动签发证书
服务端删除客户端证书 puppet cert clean web10.yanyi.com
1 2 3 4
| [root@web9 ~] Notice: Revoked certificate with serial 5 Notice: Removing file Puppet::SSL::Certificate web10.yanyi.com at '/var/lib/puppet/ssl/ca/signed/web10.yanyi.com.pem' Notice: Removing file Puppet::SSL::Certificate web10.yanyi.com at '/var/lib/puppet/ssl/certs/web10.yanyi.com.pem'
|
客户端删除ssl相关文件 rm -rf /var/lib/puppet/ssl/*
服务端创建自动签发的配置文件 /etc/puppet/autosign.conf
加入如下内容
修改服务端 puppet 配置文件 /etc/puppet/puppet.conf
在 [main] 下加入内容 autosign = true

服务端重启puppetmaster服务 /etc/init.d/puppetmaster restart
1 2 3
| [root@web9 ~] 停止 puppetmaster: [确定] 启动 puppetmaster: [确定]
|
客户端重启puppet服务 /etc/init.d/puppet restart
1 2 3
| [root@web10 ~] Stopping puppet agent: [确定] Starting puppet agent: [确定]
|
服务端 puppet cert list –all#可以看到web10.aming.com已经签名
如果客户端不重启puppet服务,也可以通过命令来自动签发
puppet agent –test –server web9.yanyi.com
1 2 3 4 5
| [root@web9 ~] Notice: Revoked certificate with serial 6 Notice: Removing file Puppet::SSL::Certificate web9.yanyi.com at '/var/lib/puppet/ssl/ca/signed/web9.yanyi.com.pem' Notice: Removing file Puppet::SSL::Certificate web9.yanyi.com at '/var/lib/puppet/ssl/certs/web9.yanyi.com.pem' Notice: Removing file Puppet::SSL::Key web9.yanyi.com at '/var/lib/puppet/ssl/private_keys/web9.yanyi.com.pem'
|
1 2 3 4 5 6
| [root@web9 ~] Info: Creating a new SSL key for web9.yanyi.com Info: csr_attributes file loading from /etc/puppet/csr_attributes.yaml Info: Creating a new SSL certificate request for web9.yanyi.com Info: Certificate Request fingerprint (SHA256): 84:AA:7D:13:C6:9C:F6:8E:25:7E:27:69:7C:1E:12:F1:8C:D9:D6:3B:49:74:83:E3:1A:15:9F:F0:37:F7:35:84 Exiting; no certificate found and waitforcert is disabled
|
1 2 3
| [root@web9 ~] + "web10.yanyi.com" (SHA256) 92:F3:04:9E:01:D5:A6:4B:BF:51:22:89:A2:51:F9:7A:1E:D1:53:13:19:49:2A:3D:58:9D:38:39:17:D3:AC:E2 + "web9.yanyi.com" (SHA256) 26:5D:91:D4:B9:58:62:66:CB:48:6A:3F:CB:51:5B:DD:4C:9B:72:39:34:6E:01:C5:41:C6:DB:EE:93:3F:5D:20 (alt names: "DNS:puppet", "DNS:puppet.yanyi.com", "DNS:web9.yanyi.com")
|
五、测试证书
服务端编辑配置文件 /etc/puppet/manifests/site.pp
添加如下内容
1 2 3 4 5
| node default { file {"/tmp/123.txt": content => "test,test"; } }
|

说明:如果不配置该文件,则客户端不会同步任何数据
客户端上稍等一会(每隔30s会自动执行服务端上的任务),或者直接命令行
这样在客户端的/tmp/下会有个123.txt文件,内容为test,test
1 2 3 4
| [root@web10 ~] 123.txt yum.log [root@web10 ~] test,test
|
六、配置模块
定义模块管理
模块是 puppet 的配置单元,模块里面会包含类和资源。同步文件、远程执行命令、cron 等叫做资源,都是通过模块来实现的。下面我们来写一个模块
服务端创建目录 mkdir /etc/puppet/modules/testm这个目录名字也作为模块名字
然后继续创建模块对应的子目录
files里面存文件,可以留空,manifests里面是配置文件,templates里面是模块文件可以为空
在 files 创建文件 1.txt,内容随意
创建配置文件 /etc/puppet/modules/testm/manifests/init.pp
内容为
1 2 3 4 5 6 7 8
| class testm{ file {"/tmp/2.txt": owner => "root", group => "root", mode => 0400, source => "puppet://$puppetserver/modules/testm/1.txt" } }
|
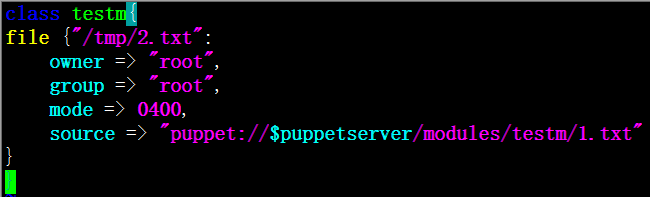
说明:类名字也叫做testm, 类下面定义了一个资源file,文件名字叫做/tmp/2.txt , owner,group,mode定义文件的属主、数组以及权限,source定义这个文件从哪里获取。 $puppetserver一会也要定义一下,这里指的是puppet server服务器上/etc/puppet/modules/testm/files/1.txt
下面要继续定义一个很关键的配置文件:/etc/puppet/manifests/site.pp
内容如下
1 2 3 4
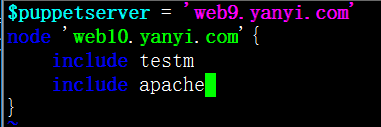
| $puppetserver = 'web9.yanyi.com' node 'web10.yanyi.com'{ include testm }
|

说明:$puppetserver 定义服务端的主机名,node后面为客户端的主机名,这里面定义该客户端要加载的模块
配置完成后,在客户端执行命令:
如果客户端上启动了puppet服务,不用执行这命令,它也会自动同步的

七、文件或目录资源
上面的模块其实只是同步了一个文件而已,那么要想同步一个目录如何做?我们可以通过实现同步一个目录来做一个包发布系统。 比如在一台机器上编译安装好了apache,那么就可以通过这样的模块把这个apache目录整个分发到其他机器上。
1 2 3 4 5 6 7 8 9
| [root@web9 ~] [root@web9 modules] testm [root@web9 modules] [root@web9 testm] files manifests templates [root@web9 testm] [root@web9 manifests] init.pp
|
模块配置文件如下:
1 2 3 4 5 6 7 8 9
| class apache{ file {"/usr/local/apache2": owner => "root", group => "root", source => "puppet://$puppetserver/modules/apache/apache2", recurse => true, purge => true } }
|

其中recurse=>true 这个参数很关键,它表示递归的意思,没有这个不能同步目录。 purge参数可以保证当服务端删除某个文件,客户端可以跟着删除。
因实验虚拟机没 apache 目录更改为 testm

参考Puppet学习之文件管理
在 puppet 目录下有个 manifests 目录,编辑下边的配置文件
1 2 3
| [root@web9 puppet] [root@web9 manifests] site.pp
|
添加内容 include apache
查看 客户端 /usr/local 目录,下边多了 apache2 文件夹

八、远程执行命令
编辑配置文件 /etc/puppet/modules/testm/manifests/init.pp
添加内容
1 2 3 4 5
| exec {"123": unless => "test -f /tmp/yanyi.txt", path => ["/bin", "/sbin", "/usr/bin", "/usr/sbin"], command => "touch /tmp/yanyi.txt" }
|

说明:123只是作为该资源的一个名字,unless后面的命令作为一个条件,当条件成立时,不会执行下面的命令,如果想要条件成立时,执行下面的命令,用 onlyif。要注意的是,我们一定要给执行的这条命令加个条件,使用unless就可以,必须满足这个条件才能执行命令,否则这个命令会一直执行,不太妥当。
查看客户端的 tmp 是否生成 yanyi.txt 文件
1 2 3 4 5 6
| [root@web10 ~] 总用量 8 -rw-r--r-- 1 root root 0 2月 20 23:31 yanyi.txt -r-------- 1 root root 6 2月 17 04:30 2.txt -rw-r--r-- 1 root root 9 2月 17 03:40 123.txt -rw-------. 1 root root 0 2月 15 06:16 yum.log
|
参考 puppet exec
九、任务计划
编辑配置文件 /etc/puppet/modules/testm/manifests/init.pp
添加内容
1 2 3 4 5 6
| cron {"yanyi1": command => "/sbin/ntpdate time.windows.com", user => "root", minute => "*/10", }
|
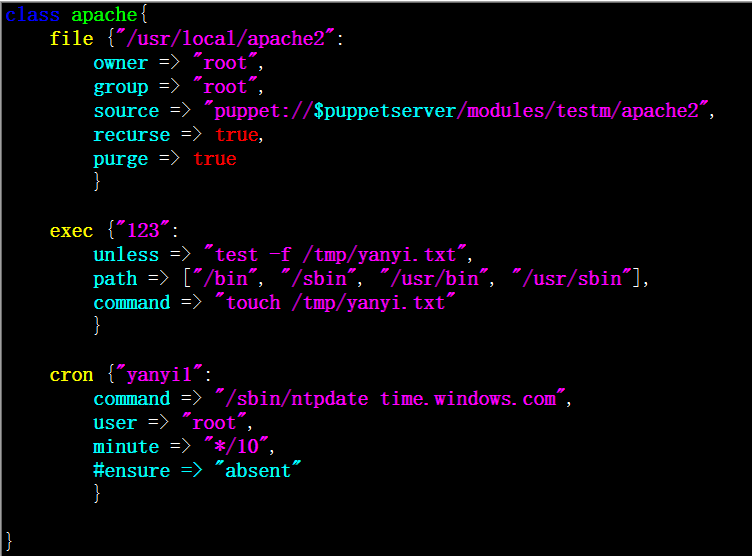
说明:分时日月周分别对应puppet里面的minute,hour,monthday,month,weekday,ensure设置为absent为删除该任务,如果不设置改行则为建立
查看客户端是否生成该计划任务

参考 puppet cron